Building microservices using Terraform, Ansible, Docker, Docker Compose, and Github Actions.
This blog post explores the benefits of microservices in building a scalable and maintainable application.
Infrastructure as code(IAC) is a methodology for deploying, configuring, and managing servers. Typically when you need to host your application on the internet, you create VMs on hosting providers like Linode, Vultr, DigitalOcean, AWS, or GCP. Once the VMs are up, you either SSH directly into the instance or use a CICD workflow to get your application running on the VM. Using IAC tools, we can automate this process. This guide will cover Terraform, Ansible, Docker, and GitHub Actions to build microservices.
A demo of what we will be building is shown below.
Tools used
1. Terraform
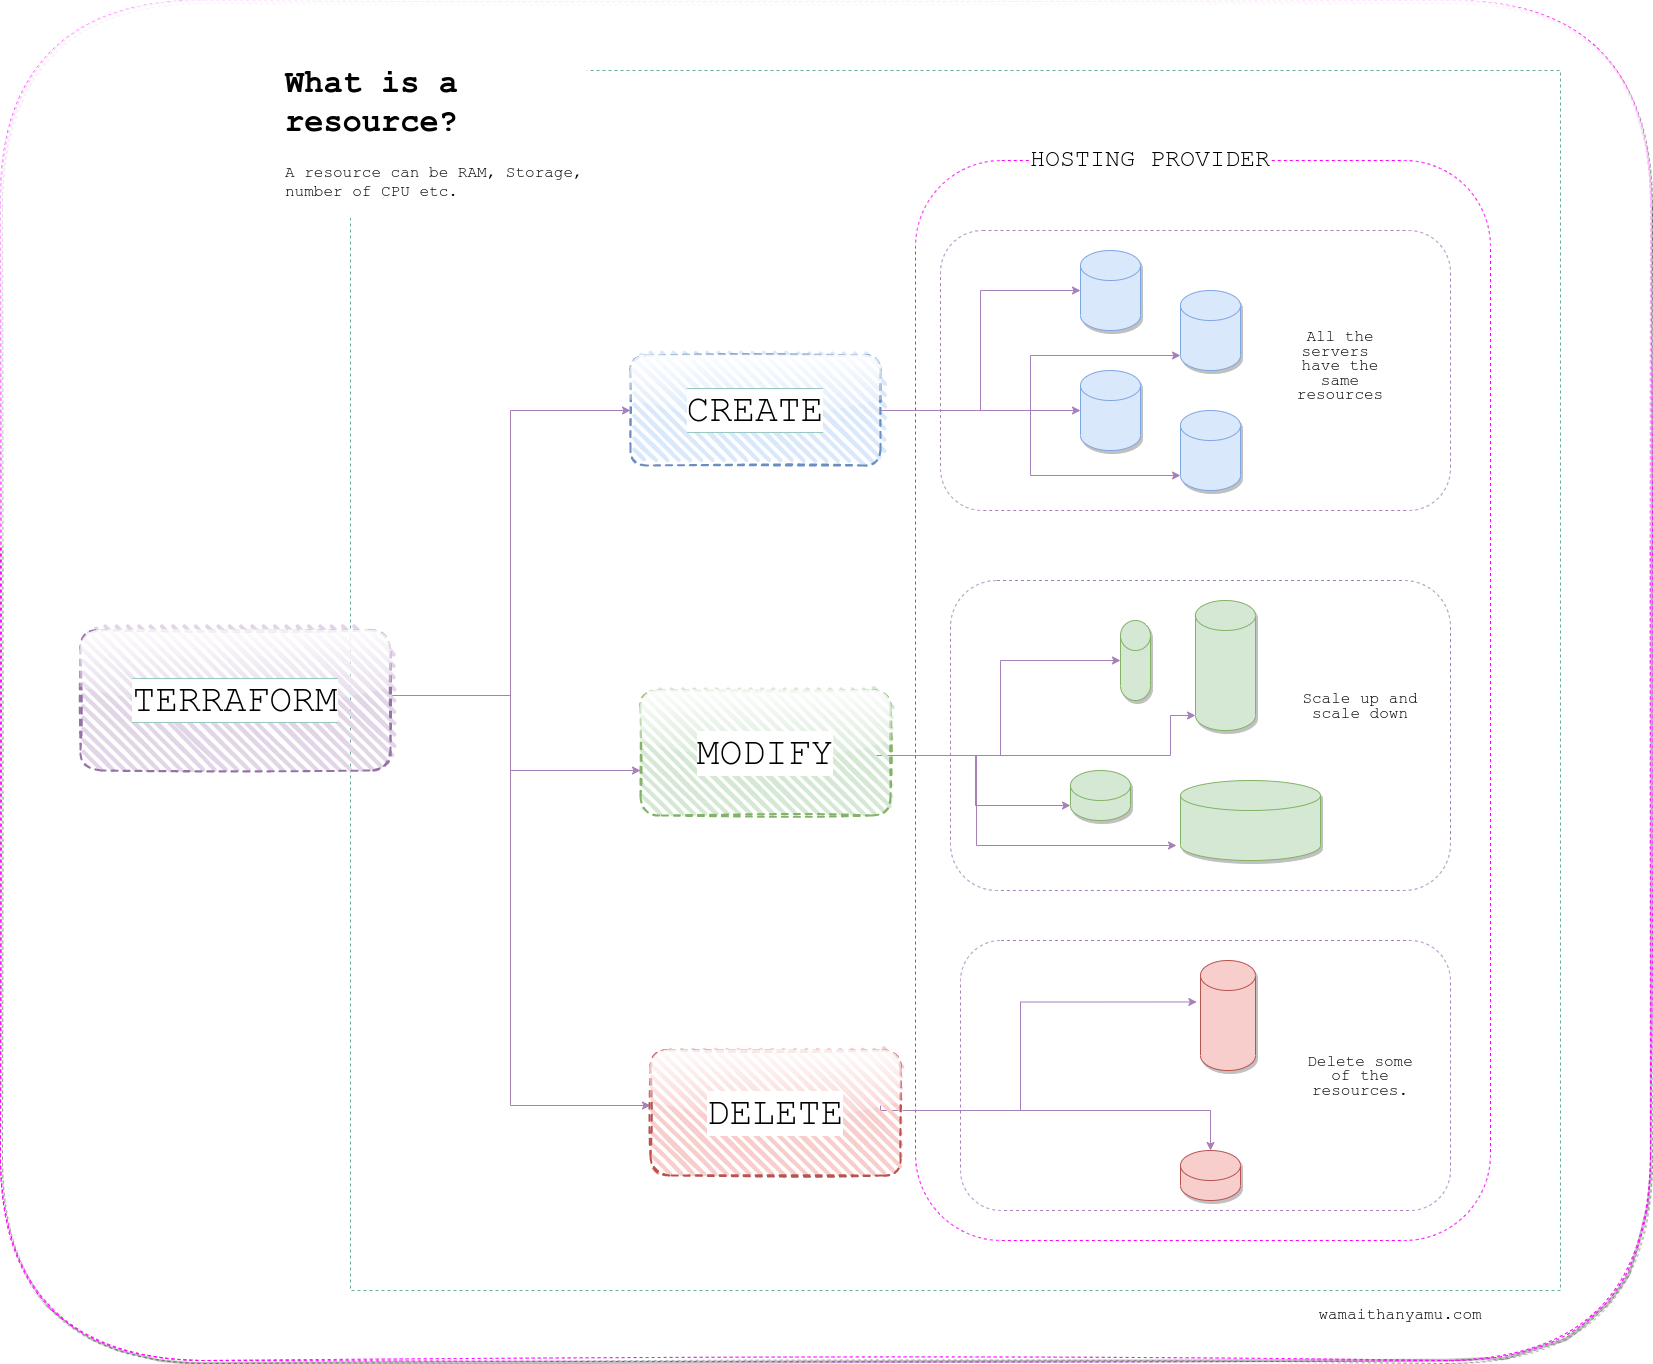
Terraform is an IAC tool widely adopted to create, modify and destroy servers. Normally you would log on to Linode and deploy a Linux Server manually while specifying how many vCPUs, RAM, and storage your project will need. Terraform allows users to write a file that, when executed, will deploy the server on Linode. Terraform also allows the user to modify the servers by scaling up or down different resources. For example, increasing the amount of RAM an existing server has. Terraform can consequently destroy all or some of the servers as needed.
2. Ansible
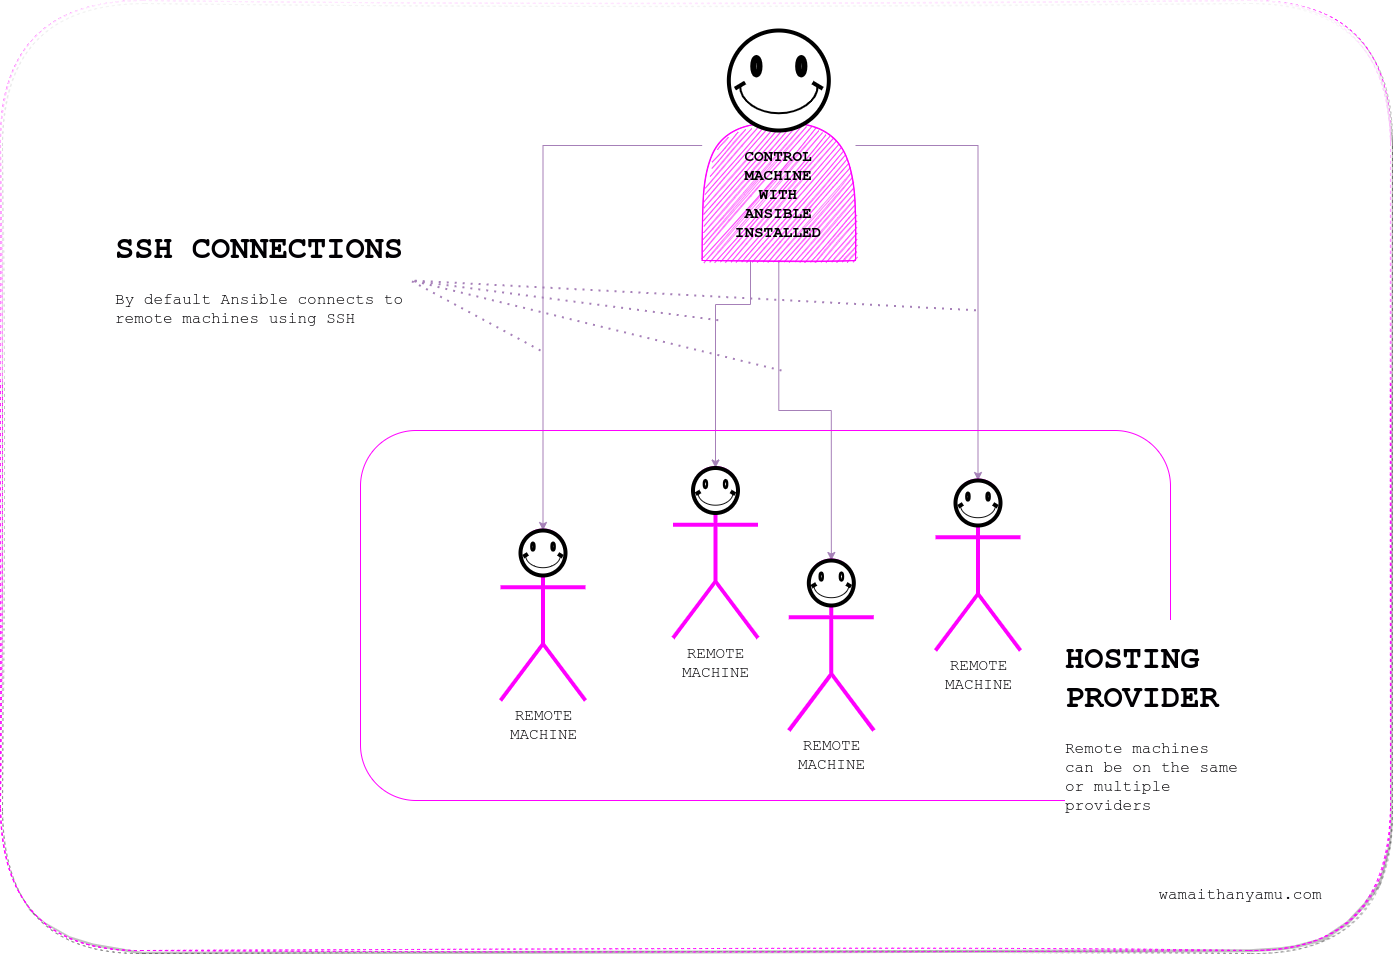
Ansible is a suite of software IAC tools for configuration management, deployments, and software provisioning. Ansible works the same way a puppet master and his dolls do. The puppet master pulls strings that control the doll(s) to make them move or do something. The puppet master, in this case, is called the control machine, while the dolls are the remote machines. The strings that connect the doll and the puppet's hand are SSH connections. Ansible is only installed on the control machine. Therefore, the remote machines do not need special configurations making Ansible agentless.
3. Github Actions
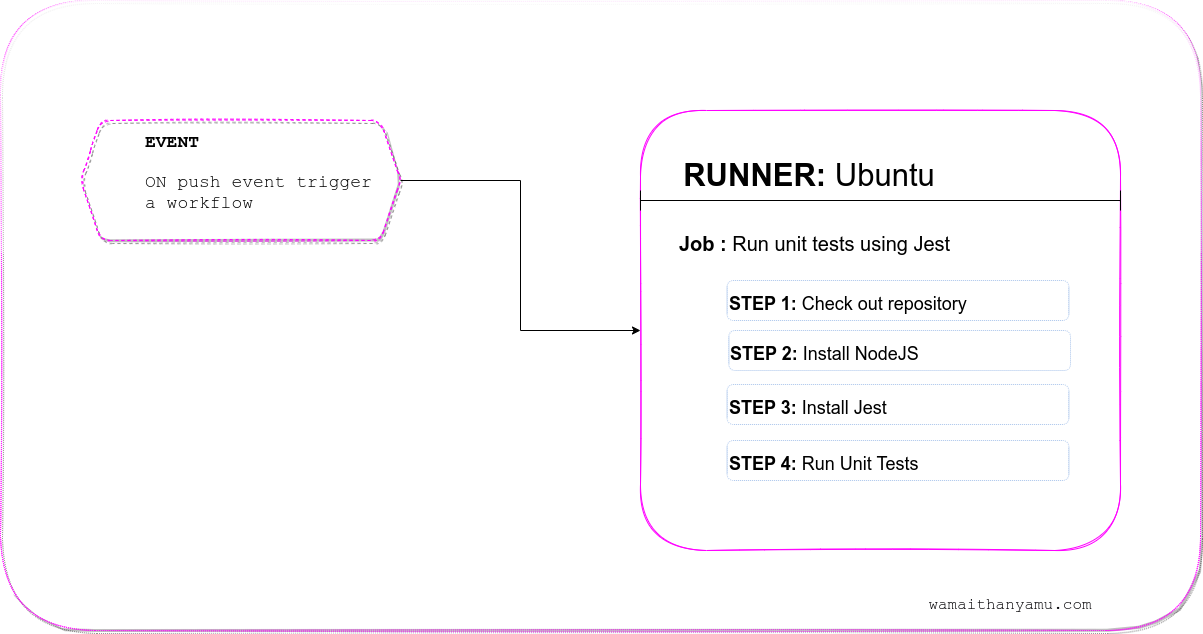
Github Actions is a CICD platform that allows users to automate the build, test, and deployment pipelines when an event happens. Github Actions works through workflows. A workflow is a configurable automated process running one or more jobs. A repository can have one or more workflows.
For example, we can have a workflow that runs tests using Jest on every push request. Yet another workflow can deploy the application on every merge to the master branch. Events trigger the workflows. An event on Github can be a pull request, push a commit, or open or closed issue. The workflow runs a series of steps known as a job. The workflow runs on servers provisioned by Github called runners. Github provisions runners for Linux, Windows, and macOS. Therefore, if you're building a program that's meant to be run on windows specifically, you can create a workflow that runs on the Windows environment.
4 . Docker
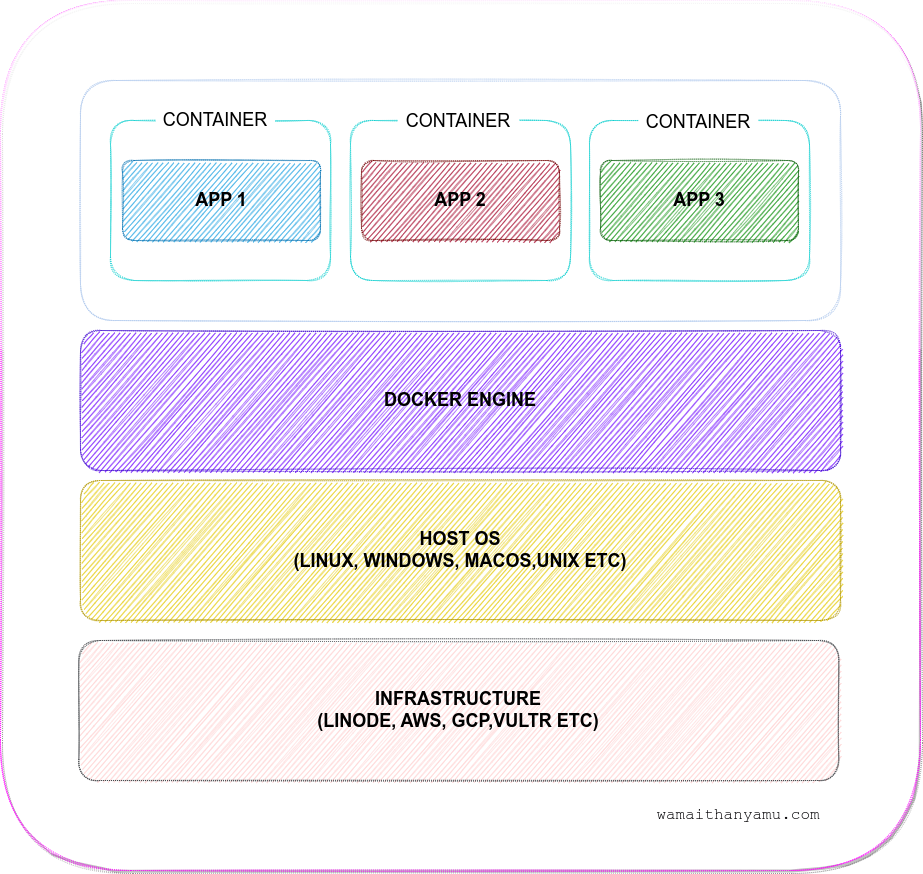
Docker solves the classical problem of working on my machine but not on my friend's machine. Docker does this by providing a virtualization layer on the operating system it's installed on. The software is delivered in packages called containers. The container is realized from a docker image. A docker image is an immutable(Cannot be changed) snapshot of the environment in the container that will run the software. Immutability means the image can be consistently deployed in any environment.
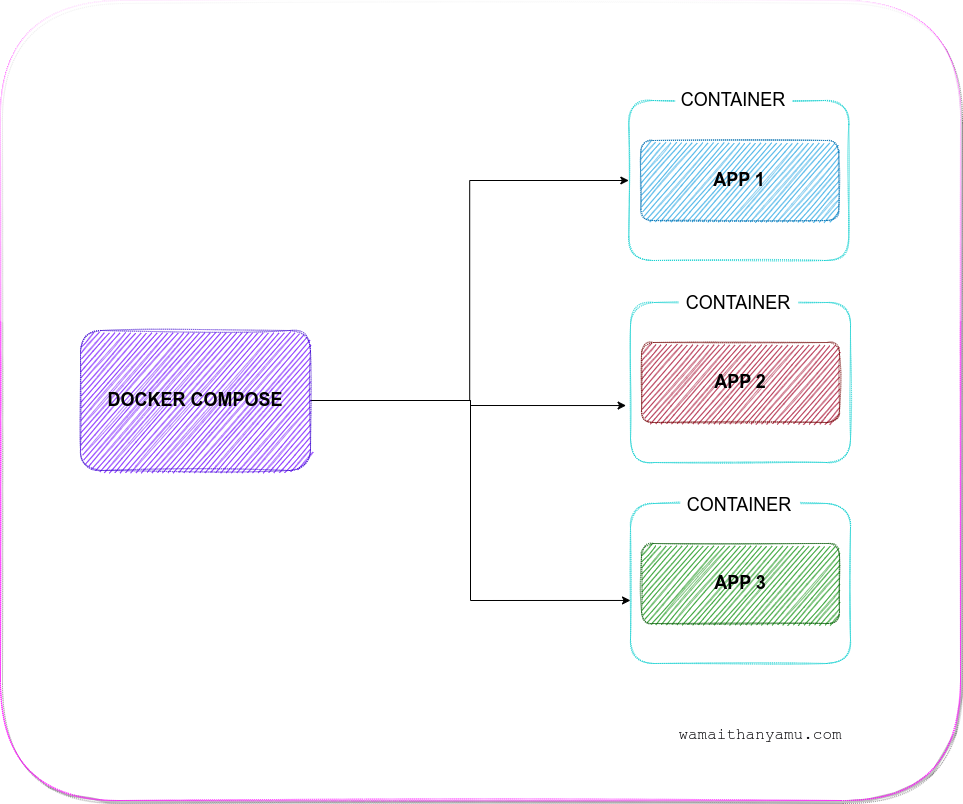
5. Docker Compose
Compose is a tool for defining and running multi-container Docker applications. Our example will have five microservices, each on its own docker container. Using docker-compose, we will configure and manage these services. Docker compose is the puppet master, while the containers are the dolls.
Project Overview
This guide will use Linode as the hosting provider to deploy a full-stack application using React for the front end and five microservices on the back end. The microservices are:
Kanye as a service - Kanye jokes being served as a Python application.
Dad Jokes as a service - dadjokes being served as a Python application.
My jokes as a service - custom jokes being served using NodeJs from a MongoDB microservice.
React is served with nginx as a web server.
MongoDB stores the jokes added to microservice 3.
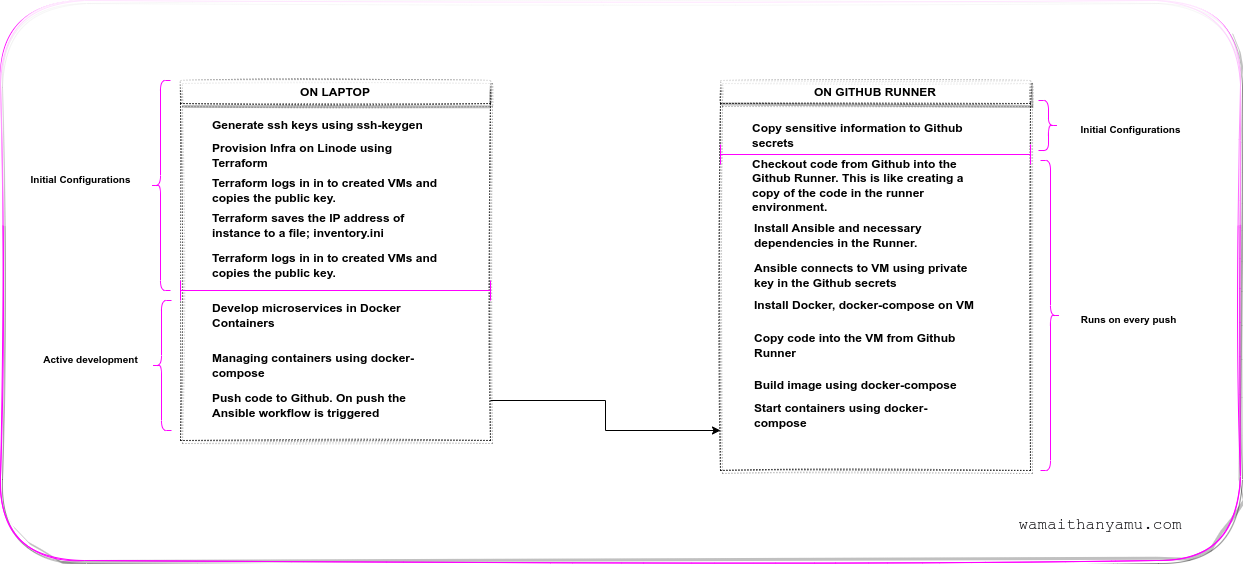
Since we will not be provisioning infrastructure every time, we will run Terraform on the laptop and let Github Actions handle CICD with Ansible. The initial setup steps will be:
Generate an API key on Linode.
Install Terraform locally
Generate ssh keys.
Spin up a nanode using Terraform.
Terraform logs on to the VM and copies the public key to the nanode.
Development steps once the infrastructure is up will be:
Develop microservices in Docker containers.
Manage containers using docker-compose.
Push code to Github.
The Github runner updates the code in the VM using Ansible. Ansible will:
Login to VM using the private key.
Copy the new code into the VM
Rebuild the docker images and spin the containers using docker-compose.
Prerequisites
Github account and git installed on your laptop.
Docker installed on your laptop.
Javascript and Python knowledge. The focus will be on the DevOps aspects of the project.
Linode account.
Bash for executing bash scripts
The code on this blog was written on Ubuntu 22.04.1 LTS. You may need to do more tweaking to support your current OS.
Installations
Install terraform on Linux.
wget -O- https://apt.releases.hashicorp.com/gpg | gpg --dearmor | sudo tee /usr/share/keyrings/hashicorp-archive-keyring.gpg &&
echo "deb [signed-by=/usr/share/keyrings/hashicorp-archive-keyring.gpg] https://apt.releases.hashicorp.com $(lsb_release -cs) main" | sudo tee /etc/apt/sources.list.d/hashicorp.list && sudo apt update && sudo apt install terraform
Install Ansible
python3 -m pip install ansible
Install ssh-pass. Used to pass password to ssh-copy-id when Terraform logs in to the VM to copy the public key.
sudo apt-get install sshpass
Microservices
We will start with the backend microservices REST APIs.All services will be in the microservices folder.
Dad Jokes as a service.
The service runs a flask app using gunicorn. The folder structure is as shown below:
Project_Folder
└─── microservices
    └─── Dadjokes
         | .dockerignore
         | dadjokes.py
         | Dockerfile
         | gunicorn.sh
         | requirements.txt
         | wsgi.py
    | docker-compose.yml
Code in .dockerignore excludes the Dockerfile from being included during the copying of files to docker.
# .dockerignore
Dockerfile
Code in dadjokes.py
# dadjokes.py
from flask import Flask
import requests
import json
from flask_cors import CORS

app = Flask(__name__)
CORS(app)

@app.route("/dadjoke", methods=['GET'])
def random_dad_joke():
    random_dad_joke = requests.get("https://icanhazdadjoke.com/",
                                   headers={"Accept": "application/json"})
    random_dad_joke = json.loads(random_dad_joke.text)["joke"]

    return json.dumps(random_dad_joke)
Code in gunicorn.sh
#!/bin/sh
# gunicorn.sh
gunicorn -b :7000 --access-logfile - --error-logfile - wsgi:app
WSGI (Web Server Gateway Interface) is a specification for a common interface between web servers and web applications. It defines a standard way for a web server to communicate with a web application and for the web application to communicate with the web server.
The above command will start the gunicorn web server and run the WSGI application specified by wsgi:app. The wsgi part specifies the module that contains the application, and the app part specifies the name of the application within the module. In this case, the module is specified in the wsgi.py The server will listen for connections on the port 7000 and write access and error logs to the console. The -b flag specifies the address and port on which the server should listen for connections. Therefore the server will listen on port 7000 on all available network interfaces. The --access-logfile and --error-logfile flags specify the locations of the access and error log files, respectively. The - character indicates that the log output should be written to standard output (the console) rather than a file.
Code in wsgi.py
# wsgi.py
from dadjokes import app

if __name__ == "__main__":
    app.run(debug=True)
Code in requirements.txt
# requirements.txt
flask
requests
gunicorn
flask-cors
Code in the Dockerfile
# Dockerfile
FROM python:3.8-slim-buster

WORKDIR /app

COPY requirements.txt requirements.txt
RUN pip3 install -r requirements.txt

COPY . .

EXPOSE 7000
CMD ["./gunicorn.sh"]
The Dockerfile creates a Docker image that will be run as a container. When the Docker image is built using this Dockerfile, it will create a container that has the Python 3.8 environment and installs the packages listed in requirements.txt, and runs the gunicorn web server on port 7000.
The first line of the Dockerfile specifies the base image on which the container should be based. Here the base image is python:3.8-slim-buster, which is a minimal Python 3.8 installation on top of the Debian "Buster" operating system.
The WORKDIR instruction sets the current working directory for subsequent instructions in the Dockerfile. The working directory is set to /app.
The COPY instruction copies a file or directory from the host file system into the container. The requirements.txt file is copied from the host into the /app directory in the container.
The RUN instruction runs a command in the container. The command pip3 install -r requirements.txt is run, which installs the Python packages listed in the requirements.txt file.
The second COPY instruction copies the entire current directory (.) from the host into the /app directory in the container. This will include all the files and directories in the current directory, including the gunicorn.sh script.
The EXPOSE instruction specifies the port that the container should expose to the host. The container will expose port 7000.
The CMD instruction specifies the command that should be run when the container is started. The command is ./gunicorn.sh, which is a shell script that starts the gunicorn web server.
Add the service to docker-compose.yml.
version: '3.8'

services:
  dadjokes:
    image: dadjokes
    container_name: dadjokes
    build:
      context: ./DadJokes
    networks:
      - dadjokes
    ports:
      - "7000:7000"

networks:
  dadjokes:
The first line version: '3.8'specifies the version of the Docker Compose file format being used.
The services block defines the services that make up the application. The first service isdadjokes.
The image property specifies the name of the Docker image that should be used to create the container. The image name is dadjokes.
The container_name property specifies the name that should be given to the container when it is created. The specified container name is dadjokes.
The build block specifies the build options for the service. The context property specifies the directory that contains the Dockerfile used to build the image. For dadjokes the Dockerfile is located in the ./DadJokes directory.
The networks block specifies the networks that the container should be connected to. The container will be connected to a network called dadjokes.
The ports block specifies the port mapping between the container and the host. Port 7000 on the container will be mapped to port 7000 on the host. This means that connections to port 7000 on the host will be forwarded to the container, and the container will be able to receive connections on port 7000.
The networks section defines a network called dadjokes. When you run docker-compose up, Docker will create this network if it doesn't already exist. The dadjokes service is then connected to this network, allowing the containers to communicate with each other over the network.
Kanye as a service
The service runs a flask app using gunicorn. The structure of this service looks similar to what we have in the dadjokes service. However, the port in use is is 8080 , and the code kanye.py returns a Kanye Quote.
Project_Folder
    └─── microservices
        └─── DadJokes
        └─── Kanye # <----------------- we are here
            | .dockerignore
            | Dockerfile
            | gunicorn.sh
            | kanye.py
            | requirements.txt
            | wsgi.py
       | docker-compose.yml
Code in .dockerignore
Dockerfile
Code in Dockerfile
FROM python:3.8-slim-buster

WORKDIR /app

COPY requirements.txt requirements.txt
RUN pip3 install -r requirements.txt

COPY . .

EXPOSE 8080 # <---- different port
CMD ["./gunicorn.sh"]
Code in gunicorn.sh
#!/bin/sh
gunicorn -b :8080 --access-logfile - --error-logfile - wsgi:app
Code in kanye.py
from flask import Flask
import requests
import json
from flask_cors import CORS

app = Flask(__name__)
CORS(app)

@app.route("/kanye", methods=['GET'])
def random_kanye_joke():
    random_kanye_joke = requests.get("https://api.kanye.rest",
                                   headers={"Accept": "application/json"})
    random_kanye_joke = json.loads(random_kanye_joke.text)["quote"]

    return json.dumps(random_kanye_joke)
Code in requirements.txt
flask
requests
gunicorn
flask-cors
Code in wsgi.py
from kanye import app

if __name__ == "__main__":
    app.run(debug=True)
Add the service to the docker-compose.yml file
version: '3.8'

services:

  dadjokes:
    image: dadjokes
    container_name: dadjokes
    build:
      context: ./DadJokes
    networks:
      - dadjokes
    ports:
      - "7000:7000"

  kanye: # <-------------------- kanye service added
    image: kanye
    container_name: kanye
    build:
      context: ./Kanye
    networks:
      - kanye
    ports:
      - "8080:8080"

networks:
  dadjokes:
  kanye:
MongoDB as a service
The service is defined in the docker-compose.yml file.
version: '3.8'

services:

  dadjokes:
    image: dadjokes
    container_name: dadjokes
    build:
      context: ./DadJokes
    networks:
      - dadjokes
    ports:
      - "7000:7000"

  kanye:
    image: kanye
    container_name: kanye
    build:
      context: ./Kanye
    networks:
      - kanye
    ports:
      - "8080:8080"

  mongo: #<------------------------- add mongo
    container_name: mongo
    image: mongo:5.0
    ports:
      - "27017:27017"
    env_file:
      - .env
    environment:
      - MONGO_INITDB_DATABASE=${MONGO_INITDB_DATABASE}
      - MONGO_INITDB_ROOT_USERNAME=${MONGO_INITDB_ROOT_USERNAME}
      - MONGO_INITDB_ROOT_PASSWORD=${MONGO_INITDB_ROOT_PASSWORD}
    volumes:
      - mongo-database:/data/db
    networks:
      - mongonetwork

networks:
  dadjokes:
  kanye:
  mongonetwork:

volumes:
  mongo-database:
The service is based on the mongo:5.0 image and is run in a container named mongo. The container exposes port 27017 on the host machine, which is mapped to port 27017 in the container. Port 27017 is also the default port MongoDB runs on. This allows you to access the MongoDB database running in the container from the host machine.
The env_file and environment sections specify environment variables that will be passed to the container when it is started. The env_file section specifies a file called .env that contains environment variables, and the environment section specifies additional environment variables that will be passed to the container. These environment variables are used to configure the MongoDB database, such as the name of the database and the username and password of the root user.
The volumes section specifies a named volume called mongo-database, which is mapped to the /data/db directory in the container. This allows you to persist the data stored in the MongoDB database even if the container is stopped or removed.
Finally, the networks section specifies that the mongo container should be connected to a network called mongonetwork. This network allows the mongo container to communicate with other containers connected to the same network.
Create the .env file
Project_Folder
    └─── microservices
        └─── DadJokes
        └─── Kanye
       | docker-compose.yml
       | .env # <----- add the .env
In the .env, add the environmental variables.
MONGO_INITDB_DATABASE=admin
MONGO_INITDB_ROOT_USERNAME=root
MONGO_INITDB_ROOT_PASSWORD=example
MONGODB_CONNSTRING=mongodb://root:example@mongo:27017/test?directConnection=true&authSource=admin&replicaSet=replicaset&retryWrites=true
My Jokes Microservice
This microservice implements two endpoints in NodeJS. One endpoint will fetch data from the MongoDB service, while the other will feed data to the database.
The file structure for the microservice is as follows:
   microservices
        └─── MyJokes
            └─── Config
                | db.js
            └─── Controller
                | quoteController.js
            └─── Models
                | quoteModel.js
            └─── Routes
                | quoteRoute.js
            | .dockerignore
            | .gitignore
            | Dockerfile
            | server.js
Initialize npm and install dependencies using npm. This will create package.json and package-lock.json files.
npm init -y && npm install colors && cors && express && mongoose
The db.js contains the connection to the mongo service. The connection string will be passed as an environment variable in docker-compose.yml.
const mongoose = require('mongoose')
const colors = require('colors')

const connectDB = async () => {
  try {

    const conn = await mongoose.connect(process.env.MONGODB_CONNSTRING)

    console.log(`MongoDB Connected: ${conn.connection.host}`.cyan.underline)
  } catch (error) {
    console.error(`Error: ${error.message}`.red.underline.bold)
    process.exit(1)
  }
}

module.exports = {connectDB}
The quoteModel.js contains the Mongoose schema of the data being saved to Mongo. The data will be saved to the Quote collection.
const mongoose = require('mongoose')

const quotesSchema = new mongoose.Schema({
    quote: {
        type: String,
        required: true
    },
},
    {
        timestamps: true,
    }
)

module.exports = mongoose.model('Quote', quotesSchema)
The quoteController.js contains business logic for interfacing with the database and performing CRUD operations.
const Quote = require('../Models/quoteModel')


// @desc    Fetch random quote
// @route   GET /api/quote
// @access  Public
const randomQuote = async (req, res) => {
    try {

        Quote.count().exec(function (err, count) {
            // Get a random entry
            const random = Math.floor(Math.random() * count)
            // Again query all users but only fetch one offset by our random #
            Quote.findOne().skip(random).exec(
                function (err, result) {
                    // Tada! random user
                    return res.json(result)
                })
        })

    } catch (error) {
        console.error(error)
        res.status(500).json({ message: 'Server Error' })
    }
}

const postQuote = async (req, res) => {
    try {

        console.log(req.body)

        const { quote } = req.body

        const newQuote = new Quote({
            quote
        })
        const createdQuote = await newQuote.save()
        res.json(createdQuote)
    } catch (error) {
        console.error(error)
        res.status(500).json({ message: 'Server Error' })
    }
}

module.exports = { randomQuote, postQuote }
The quoteRoute.js defines the API routes for the two controllers. Fetching a new quote is done using get while saving to the DB uses post.
const express = require('express')

const router = express.Router()

const { randomQuote,postQuote } = require('../Controller/quoteController.js')

router.route('/').get(randomQuote)

router.route('/new').post(postQuote)

module.exports = router
The server.js will start the express server on port 3030 after connecting to the DB and serving the API on localhost:3030
const  express = require('express')
const cor = require('cors')
const  {connectDB} = require('./Config/db.js')
const quoteRoute = require('./Routes/quoteRoute.js')
// Constants
const PORT = 3030;
// App
const app = express();
app.use(cor())
app.use(express.json());
app.use('/api/quote', quoteRoute)
const start = async () => {
  try {
    await connectDB()
    app.listen(PORT,  () => {
      console.log(`Running on ${PORT}`);
    });
  } catch (error) {
    console.log(error);
  }
}

start()
The .dockerignore has:
node_modules
Dockerfile
The Dockerfile Has:
FROM node:16

# Create app directory
WORKDIR /app

# Install app dependencies
COPY package.json .
RUN npm install
# If you are building your code for production
RUN npm ci --only=production

# Bundle app source
COPY . .
EXPOSE 3030

CMD [ "node", "server.js" ]
The Dockerfile begins by specifying the base image to use as the starting point for the image being built. The base image is node:16, which is a version of the Node.js runtime.
Next, the WORKDIR instruction sets the working directory for subsequent instructions. Any files or directories added to the image will be placed in the /app directory.
The COPY instruction copies the package.json file from the source directory (the directory containing the Dockerfile) to the /app directory in the image.
The RUN instruction then runs the npm install command, which installs the dependencies listed in the package.json file. The npm ci command is similar to npm install, but is intended to be used in automated environments like continuous integration and deployment, where the package-lock.json file is also checked into version control.
The COPY instruction then copies all files and directories in the source directory (including the package.json file and the dependencies that were just installed) to the /app directory in the image.
The EXPOSE instruction indicates that the container listens on the specified port at runtime. The container will listen on port 3030.
Finally, the CMD instruction specifies the command to run when the container is started. The command is node server.js, which runs the Node.js server.
Add the service to docker-compose.yml
version: '3.8'

services:

  dadjokes:
    image: dadjokes
    container_name: dadjokes
    build:
      context: ./DadJokes
    networks:
      - dadjokes
    ports:
      - "7000:7000"

  kanye:
    image: kanye
    container_name: kanye
    build:
      context: ./Kanye
    networks:
      - kanye
    ports:
      - "8080:8080"

  mongo:
    container_name: mongo
    image: mongo:5.0
    ports:
      - "27017:27017"
    env_file:
      - .env
    environment:
      - MONGO_INITDB_DATABASE=${MONGO_INITDB_DATABASE}
      - MONGO_INITDB_ROOT_USERNAME=${MONGO_INITDB_ROOT_USERNAME}
      - MONGO_INITDB_ROOT_PASSWORD=${MONGO_INITDB_ROOT_PASSWORD}
    volumes:
      - mongo-database:/data/db
    networks:
      - mongonetwork

  myjokes:
    container_name: myjokes
    image: myjokes
    build:
      context: ./MyJokes
    ports:
      - "3030:3030"
    networks:
      - myjokes
      - mongonetwork
    links:
      - mongo
    depends_on:
      - mongo
    env_file:
      - .env
    environment:
      - MONGODB_CONNSTRING=${MONGODB_CONNSTRING}

networks:
  dadjokes:
  kanye:
  myjokes:
  mongonetwork:

volumes:
  mongo-database:
The myjokes container uses an image named myjokes, which is built from the context in the ./MyJokes directory. The ports configuration maps the container's port 3030 to the host machine's port 3030.
The networks configuration specifies the networks that the container should be connected to. The container is connected to two networks: myjokes and mongonetwork. We connect to the mongonetwork to access the database.
The links configuration specifies any containers that the container depends on. The container depends on the mongo container.
The depends_on configuration specifies any containers that must be started before the container can be started. The container is only spin up after the mongo container is up.
The env_file configuration specifies a file containing environment variables that should be passed to the container. .env in this case.
The environment configuration specifies additional environment variables that should be passed to the container. The MONGODB_CONNSTRING environment variable is being set to the value of the MONGODB_CONNSTRING variable in the .env file.
React Microservice
The front end will be built using ReactJS. The front end will contain components that interact with all our backend microservices. The dashboard will have four components:
Kanye-as-a-service component will display data from the Kanye quotes backend microservice.
Dadjokes-as-a-service will display data from the dadjokes quotes backend microservice.
Custom quotes will be what we create and store on the MongoDB microservice.
An input component for adding custom quotes to the MongoDB microservice.

On the project folder, create a react app with npm
npx create-react-app frontend
The above command will create a frontend directory. Your current directory structure should now be as follows:
microservices
    └───Dadjokes
    └───frontend # <--- new react folder
    └─── Kanye
    └───MyJokes
    | docker-compose.yml
Switch to the frontend directory
cd frontend
and install Tailwind CSS
npm install -D tailwindcss
Initialize Tailwind CSS
npx tailwindcss init
In the tailwind.config.js file created by running the above command, point the content to all subfolders within src folder.
// frontend/tailwind.config.js
/** @type {import('tailwindcss').Config} */
module.exports = {
  content: ["./src/**/*.js"],
  theme: {
    extend: {},
  },
  plugins: [],
}
Add tailwind to src/App.css .
/* frontend/src/App.css */
@tailwind base;
@tailwind components;
@tailwind utilities;
Add a script in package.json that compiles Tailwind to public/style.css
// frontend/package.json
...
  "scripts": {
    "start": "react-scripts start",
    "css": "npx tailwindcss -i ./src/App.css -o ./public/syle.css --watch",
    "dev": "npm run start && npm run css",
    "build": "react-scripts build",
    "test": "react-scripts test",
    "eject": "react-scripts eject"
  },
....
Add the compiled CSS to the public/index.html file in the public directory.
<!--frontend/public/index.html  -->
<!DOCTYPE html>
<html lang="en">
<head>
...

<link rel="stylesheet" href="style.css"/>

...
</head>
Create the following files and folders in the src folder
frontend
   └─── src
        └─── Components # <-----folder
             | Dadjokes.js
             | Kanye.js
             | MyJokes.js
             | NewJoke.js
        └─── config # <-----folder
             | config.js
The config/config.js file contains all the URLs to REST APIs from the kanye, dadjokes and myjokes microservices. Its contents are:
export default {
    services: {
      kanye: process.env.REACT_APP_KANYE_SERVICE_URL ,
      dadjokes: process.env.REACT_APP_DADJOKES_SERVICE_URL,
      myjokes: process.env.REACT_APP_MYJOKES_SERVICE_URL

    }
  }
The Components/Dadjokes.js will use the dadjoke endpoint from the config file to fetch a dadjoke from the dadjoke container. Its contents are:
// frontend/Components/Dadjokes.js
import {useEffect,useState} from 'react'
import config from '../config/config'
const Dadjokes = () => {

    const [jokes, setJokes] = useState([])
    const [loading, setLoading] = useState(false)

    const getJokes = async (e = undefined) => {
        if(e) e.preventDefault()
        setLoading(true)
        const res = await fetch(config.services.dadjokes)
        const data = await res.json()
        setJokes(data)
        setLoading(false)
    }

    useEffect( () => {
        getJokes()
    }, [])


  return (
    <div className="flex font-mono">
    <div className="flex-none w-56 relative">
        <img src="images/leo.jpg" alt="" className="absolute inset-0 w-full h-full object-cover rounded-lg" loading="lazy" />
    </div>
    <form className="flex-auto p-6 m-10  ">
        <div className="flex flex-wrap border-green-600">

            <div className="w-full flex-none mt-2 order-1 text-2xl font-bold text-slate-600">
                {loading ? 'Loading...' : jokes}
            </div>
            <div className="text-sm font-medium text-slate-400">
                Dadjokes as a service
            </div>
        </div>

        <div className="flex space-x-4 mb-5 text-sm font-medium py-4">
        <div className="flex-auto flex space-x-4" onClick={(e)=>  getJokes(e)}>
                <button className="h-10 px-6 font-semibold rounded-full bg-violet-600 text-white">
                    New Dadjoke
                </button>

            </div>
            <button className="flex-none flex items-center justify-center w-9 h-9 rounded-full text-green-600 bg-violet-50" type="button" aria-label="Like">
                <svg width="20" height="20" fill="currentColor" aria-hidden="true">
                    <path fill-rule="evenodd" clip-rule="evenodd" d="M3.172 5.172a4 4 0 015.656 0L10 6.343l1.172-1.171a4 4 0 115.656 5.656L10 17.657l-6.828-6.829a4 4 0 010-5.656z" />
                </svg>
            </button>
        </div>
        <p className="text-sm text-slate-500">
            Coming from the Dadjokes microservice
        </p>
    </form>
</div>

        )
}

export default Dadjokes
The Components\Kanye.js will use the Kanye service endpoint from the config file to fetch a Kanye quote from the Kanye container. Its contents are:
// frontend/Components/Kanye.js
import {useEffect,useState} from 'react'
import config from '../config/config'

const Kanye = () => {
    const [jokes, setJokes] = useState([])
    const [loading, setLoading] = useState(false)

    const getJokes = async (e = undefined) => {
        if(e) e.preventDefault()
        setLoading(true)
        const res = await fetch(config.services.kanye)
        const data = await res.json()
        setJokes(data)
        setLoading(false)
    }


    useEffect( () => {
        getJokes()
    }, [])


    return (

            <div className="flex font-mono">
                <div className="flex-none w-56 relative">
                    <img src="images/kanye.jpg" alt="" className="absolute inset-0 w-full h-full object-cover rounded-lg" loading="lazy" />
                </div>
                <form className="flex-auto p-6 m-10  ">
                    <div className="flex flex-wrap border-green-600">

                        <div className="w-full flex-none mt-2 order-1 text-2xl font-bold text-slate-600">
                            {loading ? 'Loading...' : jokes}
                        </div>
                        <div className="text-sm font-medium text-slate-400">
                            Kanye as a service
                        </div>
                    </div>

                    <div className="flex space-x-4 mb-5 text-sm font-medium py-4">
                    <div className="flex-auto flex space-x-4" onClick={(e)=>  getJokes(e)}>
                            <button className="h-10 px-6 font-semibold rounded-full bg-violet-600 text-white" >
                                New Kanye
                            </button>

                        </div>
                        <button className="flex-none flex items-center justify-center w-9 h-9 rounded-full text-green-600 bg-violet-50" type="button" aria-label="Like">
                            <svg width="20" height="20" fill="currentColor" aria-hidden="true">
                                <path fill-rule="evenodd" clip-rule="evenodd" d="M3.172 5.172a4 4 0 015.656 0L10 6.343l1.172-1.171a4 4 0 115.656 5.656L10 17.657l-6.828-6.829a4 4 0 010-5.656z" />
                            </svg>
                        </button>
                    </div>
                    <p className="text-sm text-slate-500">
                        Coming from the Kanye microservice
                    </p>
                </form>
            </div>


    )
}

export default Kanye
The Components\MyJokes.js will use the myjokes service endpoint from the config file to fetch a joke from the MongoDB container. Its contents are:
// frontend/Components/MyJokes.js
import { useState ,useEffect} from 'react'
import config from '../config/config'
const MyJokes = () => {

    const [jokes, setJokes] = useState([])
    const [loading, setLoading] = useState(false)

    const getJokes = async (e = undefined) => {
        if(e) e.preventDefault()

        setLoading(true)
        const res = await fetch(config.services.myjokes)
        const data = await res.json()
        setJokes(data['quote'])
        setLoading(false)
    }

    useEffect( () => {
        getJokes()
    }, [])


    return (
        <div className="flex font-mono">
            <div className="flex-none w-56 relative">
                <img src="images/joker.jpg" alt="" className="absolute inset-0 w-full h-full object-cover rounded-lg" loading="lazy" />
            </div>
            <form className="flex-auto p-6 m-10  ">
                <div className="flex flex-wrap border-green-600">

                    <div className="w-full flex-none mt-2 order-1 text-2xl font-bold text-slate-600">
                       {loading ? 'Loading...' : jokes}

                    </div>
                    <div className="text-sm font-medium text-slate-400">
                        Jokes as a service
                    </div>
                </div>

                <div className="flex space-x-4 mb-5 text-sm font-medium py-4">
                    <div className="flex-auto flex space-x-4" onClick={(e)=>  getJokes(e)}>
                        <button className="h-10 px-6 font-semibold rounded-full bg-violet-600 text-white" >
                           Load New Joke
                        </button>

                    </div>
                    <button className="flex-none flex items-center justify-center w-9 h-9 rounded-full text-green-600 bg-violet-50" type="button" aria-label="Like">
                        <svg width="20" height="20" fill="currentColor" aria-hidden="true">
                            <path fill-rule="evenodd" clip-rule="evenodd" d="M3.172 5.172a4 4 0 015.656 0L10 6.343l1.172-1.171a4 4 0 115.656 5.656L10 17.657l-6.828-6.829a4 4 0 010-5.656z" />
                        </svg>
                    </button>
                </div>
                <p className="text-sm text-slate-500">
                    Coming from the MyJoke microservice
                </p>
            </form>
        </div>

    )
}

export default MyJokes.js
The Components/NewJoke.js component has a form that submits jokes to the MongoDB service. Its contents are:
// frontend/Components/NewJokes.js
import { useState } from 'react'
import config from '../config/config'

const NewJoke = () => {
    const [joke, setJoke] = useState('')
    const [showModal, setShowModal] = useState(false)


    const handleSubmit = async (e) => {
        e.preventDefault()
        let formData = new FormData();
        formData.append('quote', joke);
        await fetch(`${config.services.myjokes}/new`,
            {
                method: "post",
                headers: {
                    'Accept': 'application/json',
                    'Content-Type': 'application/json'
                  },
                body: JSON.stringify({
                    quote: joke
                }),
            });
        setJoke('')
        setShowModal(false)

    }
    return (
        <div>


            <div className="flex" onClick={(e) => {
                e.preventDefault()
                setShowModal(!showModal)
            }}>
                <a href="/new" className="hover:border-blue-500 hover:border-solid hover:bg-white hover:text-blue-500 group w-full flex flex-col items-center justify-center rounded-md border-2 border-dashed border-slate-300 text-sm leading-6 text-slate-900 font-medium py-3">
                    <svg className="group-hover:text-blue-500 mb-1 text-slate-400" width="20" height="20" fill="currentColor" aria-hidden="true">
                        <path d="M10 5a1 1 0 0 1 1 1v3h3a1 1 0 1 1 0 2h-3v3a1 1 0 1 1-2 0v-3H6a1 1 0 1 1 0-2h3V6a1 1 0 0 1 1-1Z" />
                    </svg>
                    <h1 className='text-2xl'>New Joke</h1>
                </a>
            </div>
            {showModal &&
                <div className='w-100 flex justify-center py-10  w-full' >
                    <form onSubmit={handleSubmit}>
                        <h1 className='text-2xl'>Create New Joke</h1>
                        <div>

                            <label className="block">

                                <textarea rows="5" cols="50" className="block text-3xl text-slate-500
                                 border border-slate-500 rounded-md shadow-sm focus:border-blue-500 focus:ring-blue-500
                                 "
                                    value={joke}
                                    onChange={(e) => setJoke(e.target.value)}
                                >

                                </textarea>
                            </label>
                        </div>
                        <div>

                            <button className="h-10 px-6 font-semibold rounded-full bg-violet-600 text-white"
                                type='submit'
                            >
                                Save
                            </button>
                        </div>

                    </form>
                </div >

            }

        </div>
    )
}
export default NewJoke
All the components are rendered in frontend/App.js
// frontend/App.js
import Kanye from "./Components/Kanye";
import Dadjokes from "./Components/Dadjokes";
import MyJokes from "./Components/MyJokes";
import NewJoke from "./Components/NewJoke";
function App() {

  return (
    <div className="flex justify-center">

        <div className="flex justify-center flex-col space-y-4 px-10 w-1/2 py-10">
            <NewJoke />
            <MyJokes />
            <Dadjokes />
            <Kanye />
        </div>
    </div>
  );
}

export default App;
Create the following files in the frontend folder
  └─── frontend
            └─── nginx # <-- create this
                | nginx.conf # <-- create this
            └─── public
            └─── src
            | .dockerignore # <-- create this
            | .gitignore
            | Dockerfile # <-- create this
            | package-lock.json
            | package.json
            | tailwind.config.js
Since we are creating a docker-compose for use in production, we will need to serve React with a production-grade server. We do this using nginx. We will create a multi-stage Dockerfile that will allow us to build the react app and then serve it using an nginx image. In the nginx, we will also set up a reverse proxy. A reverse proxy is a server that sits between client computers and backend servers and forwards incoming requests to the appropriate backend server.
The .dockerignore file has the following:
Dockerfile
node_modules
The Dockerfile has the following:
FROM node:16 as build

ARG KANYE_SERVICE_URL
ARG DADJOKES_SERVICE_URL
ARG MYJOKES_SERVICE_URL
ARG REACT_APP_HOST_IP_ADDRESS

ENV REACT_APP_HOST_IP_ADDRESS $REACT_APP_HOST_IP_ADDRESS
ENV REACT_APP_KANYE_SERVICE_URL $KANYE_SERVICE_URL
ENV REACT_APP_DADJOKES_SERVICE_URL $DADJOKES_SERVICE_URL
ENV REACT_APP_MYJOKES_SERVICE_URL $MYJOKES_SERVICE_URL

WORKDIR /app

COPY ./package.json /app/package.json
COPY ./package-lock.json /app/package-lock.json

RUN npm install

COPY . .

RUN npm run css
RUN npm run build

FROM nginx

COPY ./nginx/nginx.conf /etc/nginx/conf.d/default.conf

COPY --from=build /app/build /usr/share/nginx/html
This multi-stage Dockerfile builds the React application in the first stage. The first stage uses the node:16 image as the base image and installs the application's dependencies. It then copies the application code into the image and runs the css and build scripts to build the application. The css compiles Tailwind.
The second stage uses the nginx image as the base image and copies a custom Nginx configuration file into the image. It also copies the build artifacts from the first stage into the image.
The nginx.conf has the following:
server {
 listen 80;
 server_name frontend;
 location / {
   # This would be the directory where your React app's static files are stored at
   root /usr/share/nginx/html;
   try_files $uri /index.html;
 }

 location /dadjoke {
   proxy_set_header X-Real-IP $remote_addr;
   proxy_set_header X-Forwarded-For $proxy_add_x_forwarded_for;
   proxy_set_header X-NginX-Proxy true;
   proxy_pass http://dadjokes:7000/dadjoke;
   proxy_ssl_session_reuse off;
   proxy_set_header Host $http_host;
   proxy_cache_bypass $http_upgrade;
   proxy_redirect off;
 }


 location /kanye {
   proxy_set_header X-Real-IP $remote_addr;
   proxy_set_header X-Forwarded-For $proxy_add_x_forwarded_for;
   proxy_set_header X-NginX-Proxy true;
   proxy_pass http://kanye:8080/kanye;
   proxy_ssl_session_reuse off;
   proxy_set_header Host $http_host;
   proxy_cache_bypass $http_upgrade;
   proxy_redirect off;
 }


 location /myjoke {
   proxy_set_header X-Real-IP $remote_addr;
   proxy_set_header X-Forwarded-For $proxy_add_x_forwarded_for;
   proxy_set_header X-NginX-Proxy true;
   proxy_pass http://myjokes:3030/api/quote;
   proxy_ssl_session_reuse off;
   proxy_set_header Host $http_host;
   proxy_cache_bypass $http_upgrade;
   proxy_redirect off;
 }


}
All the configuration blocks for the Nginx web server that sets up a reverse proxy for the /dadjoke , /myjoke , /kanye / locations.
The proxy_set_header directives set various request headers that are forwarded to the backend server. The X-Real-IP and X-Forwarded-For headers contain the client's IP address and the X-NginX-Proxy header is set to true to indicate that the request is being proxied.
The proxy_pass directive specifies the URL of the backend server to which the request should be forwarded.
The proxy_ssl_session_reuse directive is set to off to disable SSL session reuse, which can improve security but may also reduce performance.
The proxy_set_header directive sets the Host header to the value of the $http_host variable, which contains the hostname of the original request.
The proxy_cache_bypass directive is set to the value of the $http_upgrade variable, which allows the reverse proxy to pass through WebSocket and HTTP/2 requests.
The proxy_redirect directive is set to off to disable automatic redirection of the client to the URL specified in the Location header of the backend server's response.
Run all the microservices
To run all the microservices using docker-compose run the following command on the microservices folder.
docker-compose up --force-recreate --build -d
docker-compose up is a command used to start and run a Docker Compose application. The --force-recreate flag forces the recreation of any containers that have been previously created, which can be useful if you have made changes to the application and want to ensure that the containers are recreated with the updated configuration.
The --build flag forces a rebuild of the images, even if they are already up to date. This can be useful if you have made changes to the application code or the Dockerfile and want to ensure that the images are rebuilt with the updated code.
The -d flag runs the containers in the background, allowing you to continue using the command prompt while the containers are running.
This command will start and run the Docker Compose application in the background, rebuilding the images if necessary and recreating any containers that have been previously created.
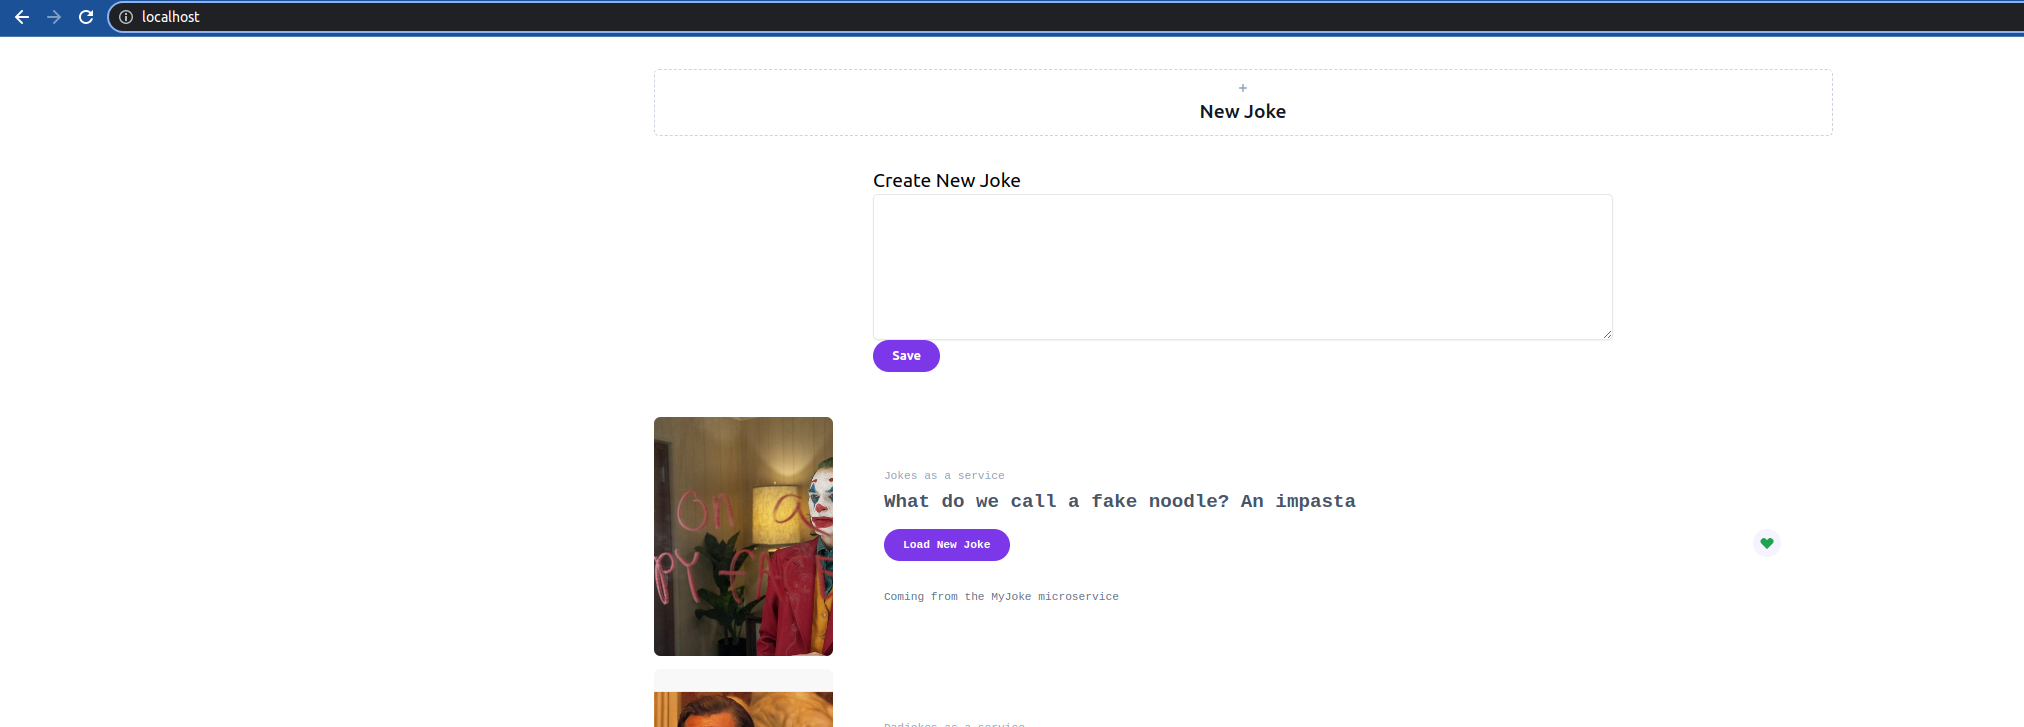
Navigate to localhost, and you should see the live react app.
Provisioning VM with Terraform
Create a terraform folder on the project root and the subsequent files, as shown below.
Project_Folder
    └─── microservices
    └─── terraform # <----- new folder
         | linode.tf
         | terraform.tfvars
         | variable.tf
Navigate to Linode dashboard and generate an API key.

Paste the key in the terraform.tfvars file. Also, pass a strong password that terraform will use as the default password on the VMs.
# variables.tf
linode-token="paste-token-here"
root_pass="a-very-strong-password"
Define variables in the variables.tf file. The variables are read from the variables.tfvars file.
# variables.tfvars
variable "linode-token" {}
variable "root_pass" {
}
variable "region" {
  default = "us-southeast"
}
The linode.tf file is where all the magic happens.
# Linode Provider definition
terraform {
  required_providers {
    linode = {
      source  = "linode/linode"
      version = "1.27.1"
    }
  }
}

# Configure the Linode provider
provider "linode" {
  token = var.linode-token
}
# Create a Linode instance
resource "linode_instance" "example" {
  image      = "linode/ubuntu20.04"
  type       = "g6-nanode-1"
  region     = "us-east"
  label      = "Microservice-blog"
  private_ip = true
  root_pass  = var.root_pass
}
output "ip_address" {
  value = linode_instance.example.ip_address
}
The code defines a Terraform configuration that uses the Linode provider to create a Linode instance running Ubuntu 20.04. The Linode provider is required to be version 1.27.1 and is configured with a token that is stored in a variable called linode-token.
The configuration then creates a Linode instance resource, specifying the image to use (linode/ubuntu20.04), the type of instance to create (g6-nanode-1), the region where the instance will be located (us-east), and a label for the instance (Microservice-blog). The instance is also configured to have a private IP address and a root password that is stored in the root_pass variable.
Finally, the configuration defines an output called ip_address that returns the public IP address of the created Linode instance.
To avoid retyping or forgetting the commands, we will build a bash script that will call terraform and perform other operations.
Create a Scripts folder in the project root folder.
Project_Folder
    └─── microservices
    └─── terraform
    └─── Scripts # <----- new folder
        | terraform_setup.sh
In terraform_setup.sh paste the code below.
#!/bin/bash
# create the directory name of the ssh keys
# $HOME is a bash variable that points to the home directory of the current user
echo "-----------------------Creating ssh keys-----------------------"
mkdir -p $HOME/.ssh/microservicekeys

# create the ssh keys
ssh-keygen -t rsa -b 4096 -C "global microservices" -f $HOME/.ssh/microservicekeys/id_rsa -N "" <<< y
echo "------Adjust permissions of generated key-files locally---"
chmod 0600 "$HOME/.ssh/microservicekeys/id_rsa" "$HOME/.ssh/microservicekeys/id_rsa.pub"

# get to root directory
cd ..

# get into the terraform directory
echo "-----------------------Starting Terraform Execution-----------------------"
cd terraform

# Terraform destroy
echo "----------------------- Terraform Destroy -----------------------"
terraform destroy -auto-approve -lock=false

# initialize terraform
terraform init

# plan terraform
echo "----------------------- Terraform Plan -----------------------"
terraform plan -lock=false

# apply terraform
echo "----------------------- Terraform Apply -----------------------"
terraform apply -auto-approve -lock=false

# save the ip address of the instance in variable ip
echo "----------------------- Terraform Output -----------------------"
ip=$(terraform output -json | jq -r '.ip_address.value')


# get back to root directory
cd ..

# get into the terraform directory
cd terraform

echo "----------------------- Copying public Key to Instance -----------------------"

# Read the terraform.tfvars file
while read -r line
do
  # Split the line into a key and a value
  key=$(echo "$line" | cut -d'=' -f1)
  value=$(echo "$line" | cut -d'=' -f2)
  # If the key is "password", store the value in a bash variable
  if [ "$key" == "root_pass" ]; then
    # Delete the quotes from the value
    password=$(echo "$value" | tr -d '"')
  fi
done < terraform.tfvars

# get back to root directory
cd ..

# save the ip to a file
echo "----------------------- Saving IP Addresses -----------------------"

# create a file to store the ip address
touch inventory.ini
echo $ip > inventory.ini


while read line;
do
    echo "----------------Copying ssh keys to server id -> $line----------------";
    sshpass -p $password ssh-copy-id -i $HOME/.ssh/microservicekeys/id_rsa.pub -o PubkeyAuthentication=yes -o PasswordAuthentication=yes -o StrictHostKeyChecking=no root@$line
done <  inventory.ini

echo "----------------------- All done now! -----------------------"
echo "Copy the following private key to the github repository secrets"
cat $HOME/.ssh/microservicekeys/id_rsa

exit

exec bash
The script first creates a directory for the SSH keys and generates a new set of RSA keys using the ssh-keygen command. It then adjusts the permissions of the generated key files and moves to the root directory.
The script then enters the terraform directory and runs terraform init to initialize Terraform, and runs terraform plan to create a plan for creating the new Linode instance. The script then applies this plan using terraform apply.
After the Linode instance is created, the script retrieves its public IP address using terraform output and stores it in a file called inventory.ini. It then reads the terraform.tfvars file to retrieve the root password for the Linode instance and uses this password to copy the public SSH key to the instance using sshpass.
Finally, the script prints the private key to the terminal and exits.
Run the script while in the Scripts folder using:
./terraform_setup.sh
On Linode, you should see the instance created.
Automating deploys with Ansible
At this point, we can use the local machine (your laptop) as an ansible controller to ssh into the VM, install dependencies, and run docker-compose.
In the project folder create a playbook.yml , ansible.cfg and a run_ansible.sh file in the Scripts folder.
Project_Folder
    └─── microservices
    └─── terraform
    └─── Scripts
        | terraform_setup.sh
        | run_ansible.sh # <---create this
    | inventory.ini
    | ansible.cfg # <---create this
    | playbook.yml # <---create this
The ansible.cfg has the following:
[ssh_connection]
pipelining=True
This is a configuration block for the ssh_connection plugin in Ansible. The pipelining option is set to True, which means that Ansible will use an optimized command execution flow that allows multiple commands to be sent to the remote host without waiting for the previous command to finish. This can improve the performance of Ansible by reducing the number of network round-trips required to execute a playbook.
The playbook.yml file has the following
---
- name: Connect to linode and install dependencies and run docker-compose
  hosts: all
  become: true
  vars:
    source: "{{ source }}"

  tasks:
    - name: Install required system packages
      apt:
        pkg:
          - apt-transport-https
          - ca-certificates
          - curl
          - software-properties-common
          - python3-pip
          - virtualenv
          - python3-setuptools

        state: latest
        update_cache: true

    - name: Install Docker
      become: true
      apt:
        name: docker.io
        state: present
    - name: Install Docker Compose
      pip:
        name: docker-compose
      tags:
        - docker

    - name: Install Python
      apt:
        name: python3
        state: present
      tags:
        - python

    - name: Synchronize src and dest, excluding node_modules subfolders
      ansible.builtin.synchronize:
        src: "{{ source}}"
        dest: /home
        rsync_opts:
          - "--exclude=**/node_modules"
          - "--exclude=**/data"

    - name: Copy env
      copy:
            src:   "{{source}}/.env"
            dest: /home/microservices/.env

    - name: Run Docker Compose Build and run image
      command: docker-compose -f /home/microservices/docker-compose.yml up --force-recreate --build -d
      tags:
        - docker
This Ansible playbook connects to the Linode instance and installs some required system packages, Docker, Docker Compose, and Python. It then synchronizes the contents of the microservices directory with a destination on the Linode instance set to /home, excluding the node_modules subfolders. The playbook copies the.env from the microservices/.env to the /home/microservices/.env on the Linode instance. Finally, the playbook runs docker-compose to build and run our Docker images using the docker-compose.yml file.
The playbook is intended to be run on all hosts in the inventory.ini file and uses become to run tasks with root privileges. The source variable is a playbook variable used to specify the local directory that should be synchronized with the destination on the Linode instance.
The run_ansible.sh bash script has the following
#!/bin/bash
# this runs ansible on your laptop
# cd to root
cd ..
#  create environment variables from .env in the microservices folder file
cd microservices

# Read the .env file and export each key-value pair as an environment variable
while read line; do
  export $line
done < .env

# cd to root and run ansible
cd ..

ansible-playbook playbook.yml -u root --private-key=$HOME/.ssh/microservicekeys/id_rsa -i inventory.ini -vvv --extra-vars "source=microservices"

echo "----------------------- All done now! -----------------------"

exit
exec bash
The script first changes the current working directory to the root directory and then enters the microservices directory. It reads the .env file and exports each key-value pair as an environment variable.
The script then changes the current working directory to the root directory and runs the ansible-playbook command to execute the playbook. The playbook is run with verbose output enabled, and the source variable is passed as an extra variable. The source variable is specified as microservices The ansible-playbook command is run with the -u flag to specify the user to connect as (root in this case) and the --private-key flag to specify the private key for authentication. The -i flag is used to specify the inventory file to use (inventory.ini), and the -vvv flag enables verbose output.
Finally, the script prints a message to the terminal and exits.
Run the script while in the Scripts folder using
./run_ansible.sh
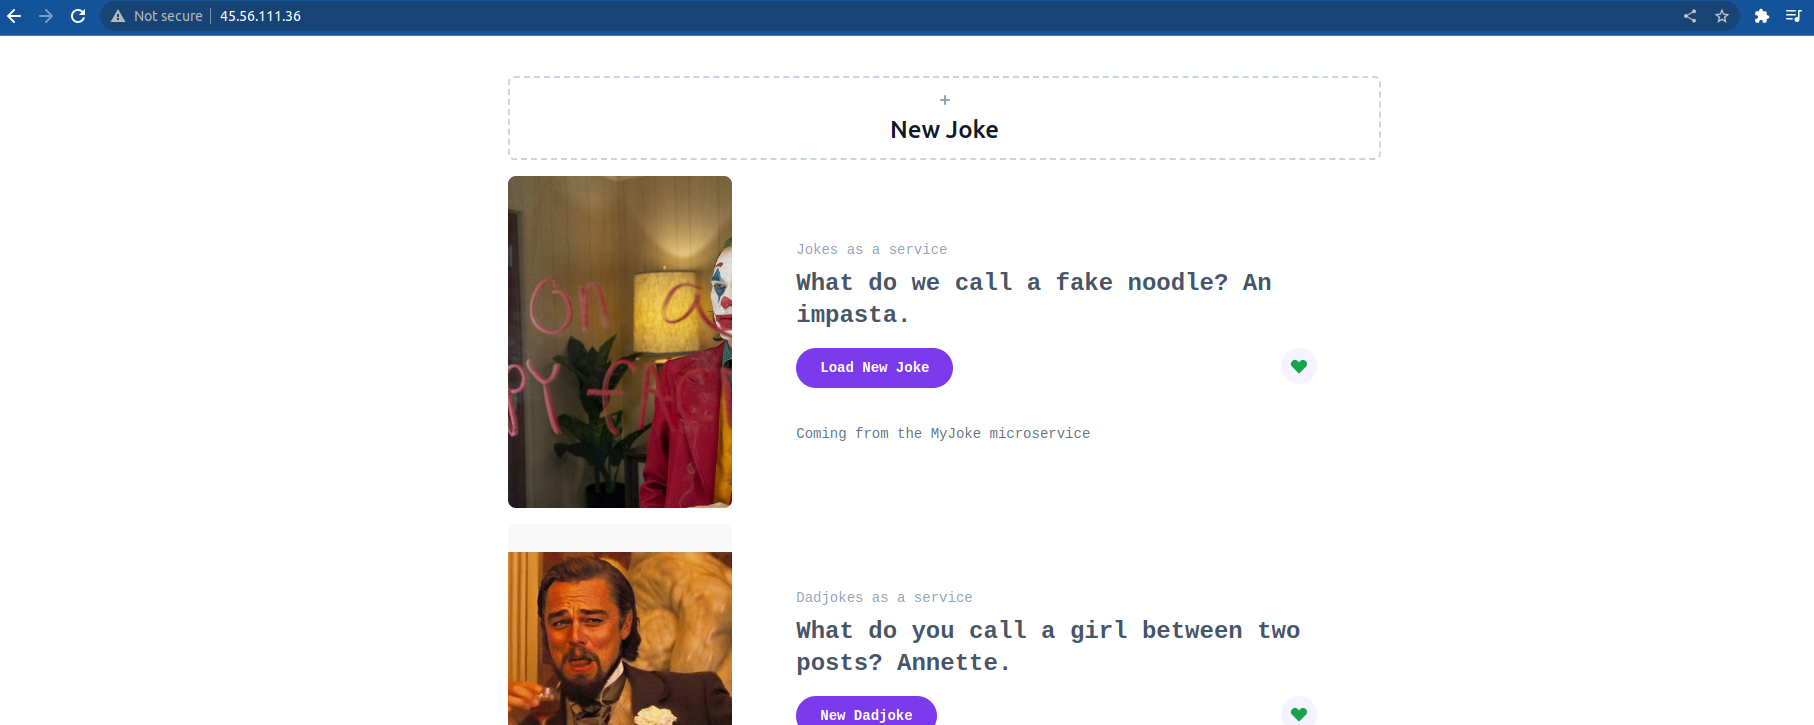
You should see the live react app if you navigate to your IP address.
Using Github Actions as the Controller Machine
Normally, you would push code to a VCS, and we want to leverage Github actions to automatically update code on the server on push. For this, we need to create a Github actions workflow.
Project_Folder
    └─── microservices
    └─── terraform
    └─── Scripts
    └─── .github # <---create this
         └─── workflows # <---create this
             | actions.yml # <---create this
    | inventory.ini
    | ansible.cfg
    | playbook.yml
The actions.yml has the following:
name: Building microservices with Terraform, Ansible, docker, docker-compose, and Github Actions
on:
  push:
      branches:
        - "main"
jobs:
  provision:
    name: Run Ansible
    runs-on: ubuntu-latest
    steps:
    - name: Checkout repository
      uses: actions/checkout@v3
    - name: Set up Python
      uses: actions/setup-python@v2
    - name: Install dependencies
      run: |
        python -m pip install ansible
    - name: Add hosts to known_hosts
      env:
        SSH_AUTH_SOCK: /tmp/ssh_agent.sock

      run: |
        mkdir -p ~/.ssh
        touch ~/.ssh/known_hosts
        ssh-keyscan -f inventory.ini > known_hosts
        cat known_hosts >> ~/.ssh/known_hosts
        ssh-agent -a $SSH_AUTH_SOCK > /dev/null
        ssh-add - <<< "${{ secrets.SSH_PRIVATE_KEY }}"


    - name: Run ansible playbook
      env:
          SSH_AUTH_SOCK: /tmp/ssh_agent.sock
      run: |
           cd microservices
           echo MONGODB_CONNSTRING="${{secrets.MONGODB_CONNSTRING}}" >> .env
           echo MONGO_INITDB_DATABASE="${{secrets.MONGO_INITDB_DATABASE}}" >> .env
           echo MONGO_INITDB_ROOT_PASSWORD="${{secrets.MONGO_INITDB_ROOT_PASSWORD}}" >> .env
           echo MONGO_INITDB_ROOT_USERNAME="${{secrets.MONGO_INITDB_ROOT_USERNAME}}" >> .env
           cd ..
           ansible-playbook playbook.yml -u root --private-key="${{ secrets.SSH_PRIVATE_KEY }}" -i inventory.ini -vvv  --extra-vars "source=microservices"
The workflow is triggered by a push to the main branch and runs on an Ubuntu machine.
The workflow consists of several steps that perform various tasks. The first step checks out the repository, and the second step sets up Python. The third step installs the dependencies required to run ansible, including the ansible package. The fourth step adds the hosts specified in the inventory.ini file to the known_hosts file, which is used to store the public keys of known hosts. This step also sets up an SSH agent to manage SSH keys and adds the private key stored in the SSH_PRIVATE_KEY secret to the agent.
The final step runs the ansible playbook, passing the private key stored in the SSH_PRIVATE_KEY secret as an argument to the --private-key flag. This step also reads the secrets stored in the repository and appends them to the .env file in the microservices directory. Finally, the ansible-playbook command is run to execute the playbook.
Add secrets in your .env to github secrets. Go to the setting tab on the Github repo


The SSH_PRIVATE_KEY is the private key generated by the terraform_setup.sh script. You can view it by running the following command:
cat $HOME/.ssh/microservicekeys/id_rsa
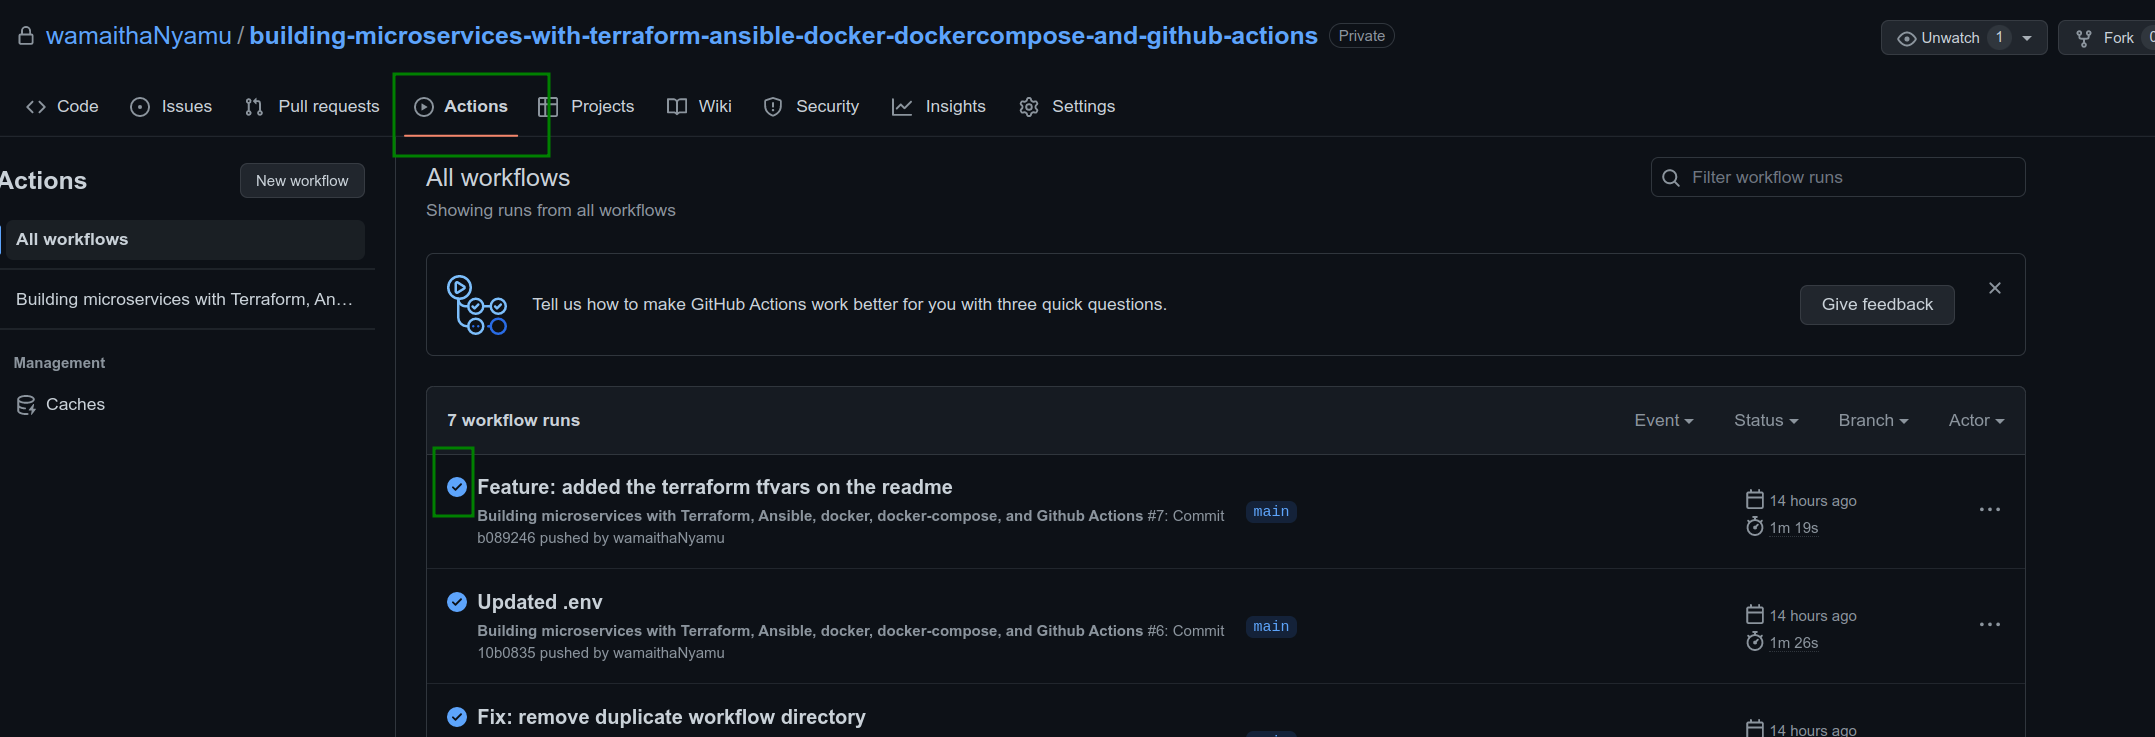
Once you push changes to github, you should have the code auto-deploy on the server
Resources:
https://www.terraform.io/use-cases/infrastructure-as-code?product_intent=terraform